Social Publisher removes the friction of social publishing. Connect your accounts directly to WordPress, prepare your message once, attach your featured image, and publish or schedule it across multiple networks from one guided workflow.
WPLIBSDesigned for non-technical users and professional content teams
yoursite.com/wp-admin
Create publication
Compose once. Publish everywhere.
Ready to publish
Destinations
inLinkedIn ×✦Bluesky ×mMastodon ×
Title
23/100
Content Workflow Guide
Content
✦ AI-ready
A smarter way to plan, create, and publish content from WordPress. Save time and stay consistent across every platform.
☺#✦
Featured image
Content workflow made simple.
content-workflow-guide.jpg
1200 × 630
×
▣ Schedule➤ Publish now
Connect accounts securely•Customize each social workflow•Publish or schedule without leaving WordPress
Built for real business workflows.
Social Publisher bridges the gap between WordPress and the social networks your audience actually uses. It is engineered specifically for site owners, content teams, and agencies who need reliable connections without the guesswork of navigating complex developer portals alone.
Direct API Connections
Centralize your social connections securely within your own server. No middleman bridging services storing your data.
Beginner-Friendly Flow
We translate complex developer terminology into plain English, ensuring you copy the right keys into the right places.
Integrated Guidance
The plugin features built-in setup instructions and clear error states to keep your workflow moving forward.
Granular WP Control
Manage authorizations, default posting behaviors, and connection status directly from your WordPress dashboard.
Organizational Accuracy
Engineered for real organizational workflows, supporting precise Facebook Page and Pinterest Board selections.
Natively Supported Networks
Social Publisher Pro
Turn the free publisher into a complete social publishing and automation hub.
Keep the familiar Social Publisher workflow and unlock scheduling, Evergreen automation, multiple accounts, Account Groups, content variations, advanced analytics, Pro destinations, and private updates.
Everything you need to publish, automate, organize, and measure from WordPress.
Free covers the core publishing workflow. Pro adds the operational layer for teams, client sites, automation, richer content, and measurable social performance.
✓
Pro destinations Publish to YouTube / Shorts and Discord, plus Remote WordPress and Custom Webhook destinations.
✓
Multiple accounts + Account Groups Organize multiple profiles and accounts, then group destinations for repeatable multi-brand and client workflows.
✓
Scheduling + Calendar Prepare posts ahead of time with a scheduled queue and a visual publishing calendar.
✓
Evergreen Campaigns Create recurring campaigns with filters, schedules, repeat protection, and automated publishing through the scheduler.
✓
Smart Evergreen selection Choose content with Random, Oldest, Least recently shared, Best performing, or AI recommended strategies.
✓
Content Variations Create manual variations globally or per network and rotate them without rewriting the original post.
✓
AI Variations Generate Professional, Conversational, or Promotional variation suggestions with the existing Gemini connection.
✓
First Comment / First Reply Automatically add a supported first comment or reply after the main social publication, with its own retry flow.
✓
Multiple Social Templates Keep several reusable templates per network instead of being limited to a single template.
✓
Advanced Smart Tags Use WooCommerce, SEO, and AI-aware Smart Tags to build richer reusable social copy.
✓
Advanced Notifications Receive detailed success, failure, partial failure, scheduler, and first-comment notifications, including digest workflows.
✓
Analytics Pro + real network metrics Review destination-level analytics with metrics collected from supported social networks.
✓
Metrics History Keep immutable metric checkpoints at 1h, 24h, 72h, and 7d for comparable performance history.
✓
Analytics CSV export Export filtered analytics by period, network, account, and status for external reporting.
✓
Best Time to Publish Get data-based recommendations for the best day and time to publish by network and, when possible, by account.
✓
Rich media + private updates Use richer image/video workflows and receive private Pro updates connected to your license.
Pricing
Simple pricing for Social Publisher Pro.
One year of updates and support. Cancel anytime. Includes a 7-day money-back guarantee.
Free
Free
$0
Great for publishing from WordPress to the core social networks with guided setup.
YouTube / Shorts, Discord, Remote WordPress, and Custom Webhook
–
✓
Multiple profiles / accounts
–
✓
Account Groups
–
✓
Scheduling + visual Calendar
–
✓
Evergreen Campaigns
–
✓
Smart Evergreen selection
–
✓
Content Variations
–
✓
AI-generated variations
–
✓
First Comment / First Reply
–
✓
Multiple Social Templates per network
–
✓
Advanced Smart Tags for WooCommerce + SEO + AI
–
✓
Advanced Notifications
–
✓
Analytics Pro + real network metrics
–
✓
Metrics History (1h / 24h / 72h / 7d)
–
✓
Analytics CSV export
–
✓
Best Time to Publish
–
✓
Private Pro updates connected to your license
–
✓
Questions
Social Publisher Pro FAQ
Does Pro replace the free plugin?
No. Social Publisher Pro is an add-on. Keep the free plugin installed, then activate Pro to unlock the advanced automation, destinations, analytics, account, and content features.
Which plan should I choose?
Choose Personal Pro for one WordPress site. Choose Agency Pro when you manage several client sites or want one license that covers up to 5 sites.
What are the biggest Pro upgrades?
Pro adds Scheduling + Calendar, Evergreen Campaigns with smart selection, multiple accounts and Account Groups, Content Variations and AI Variations, First Comment / First Reply, multiple templates, advanced Smart Tags, notifications, Analytics Pro, real network metrics, Metrics History, CSV export, Best Time to Publish, and the Pro destinations.
Can I keep using Free only?
Yes. Free remains useful for the core Social Publisher workflow. Pro is for sites that need automation, more destinations, multiple-account workflows, richer content, and advanced analytics.
Upgrade to Pro
Ready to run Social Publisher like a complete publishing system?
Add Social Publisher Pro to unlock scheduled publishing, Pro networks, video workflows, account profiles, Remote WordPress, webhooks, private updates, and support.
We explain technical terms in simple language. Whenever you see a Redirect URI, Client ID, or App Secret, always copy and paste exactly. Do not type them by hand.
Video tutorials are maintained on this website.
The existing network guides include step-by-step videos here on the Social Publisher page. The new Pro destinations below already include the complete written setup; their videos will be added here as they are recorded.
Select Platform
Connecting Bluesky
Use this connection so Social Publisher can publish to your Bluesky account. The setup is short and beginner-friendly, but there is one key detail: you must use an App Password created inside Bluesky, not your normal login password.
What you will need
A Bluesky account
Your Bluesky handle, for example yourname.bsky.social
Access to your Bluesky settings while Social Publisher is open in another tab
Keep in mind
An App Password is a special password created for apps.
Never paste your normal Bluesky password into Social Publisher.
Copy the handle and the App Password exactly as Bluesky shows them.
Warning
A Bluesky App Password is not the same as your main Bluesky password. Social Publisher should only receive the App Password you create inside your Bluesky settings.
Step-by-Step Configuration
Video tutorial: connect Bluesky step by step
Watch the recorded setup before following the written steps. It shows exactly where to create the Bluesky App Password and where to paste it in Social Publisher.
1Create or confirm your Bluesky account
Open bsky.app and sign in to your Bluesky account. If you do not have one yet, create it first. Keep it open because in the next step you will create a special password.
Inside Bluesky, open Privacy & Security and create a new App Password. This is the secure password made for external tools like Social Publisher. Copy it as soon as Bluesky shows it, because that exact value is what you will paste into Social Publisher.
Important: you do not need to create a developer app for Bluesky. This step is done directly inside your account settings.
B1 — Open Privacy & Security in Bluesky and enter App Passwords.B2 — Create a new App Password and copy it carefully.
Do not paste your normal Bluesky login password into Social Publisher. Paste only the new App Password created on this screen.
3Paste your details into Social Publisher and test the connection
Go back to Social Publisher and enter your Bluesky handle and the App Password you just copied. Your handle is the public account name, for example yourname.bsky.social. Then click Save and test.
B3 — Enter the handle and the App Password in Social Publisher, then run Save and test.
It is connected when…
It is connected when the Bluesky status inside Social Publisher changes to Connected or shows a successful test result.
Connecting Mastodon
Social Publisher connects to Mastodon through your server and a simple approval screen. The most important thing is understanding what the server is: it is the second part of your Mastodon address.
What you will need
A Mastodon account
The server part of your address
Permission to approve the connection in your browser
Keep in mind
If your account is name at mastodon.social, the server is mastodon.social.
Type only the server name, not the full address name at server.
You must approve the permissions screen for publishing to work.
Helpful tip
A server is the main website where your Mastodon account lives. Example: if your account is name at mastodon.social, your server is mastodon.social.
Step-by-Step Configuration
Video tutorial: connect Mastodon step by step
Watch the recorded setup before following the written steps. It shows how to connect Mastodon to Social Publisher and where to complete each setting.
1Create or open your Mastodon account
Make sure you already have a Mastodon account and that you can sign in. If you are new to Mastodon, create your account first and note the full address you use there.
In Social Publisher, type only the server part of your Mastodon address. Do not include your username, the @ symbol, or any extra text. Save the settings after entering the server.
M1 — Enter only the Mastodon server name, not the full account address.
3Connect and approve access
Click Connect with Mastodon. Mastodon will open a permissions page so you can approve the connection. Allow access, return to Social Publisher, and confirm that your account now appears connected for publishing.
M2 — Approve the permissions request and then return to Social Publisher.
It is connected when…
It is connected when Social Publisher shows Mastodon as connected and ready to publish.
Connecting Tumblr
Social Publisher needs a small app setup before it can connect to Tumblr. Do not worry: most of the work is simply copying the correct values from Tumblr into Social Publisher.
What you will need
A Tumblr account and blog
Your Blog Identifier
A Callback URL copied exactly from Social Publisher
Keep in mind
Your Blog Identifier is usually just the host of your blog, for example yourblog.tumblr.com.
The Callback URL and the OAuth Redirect URL must match exactly.
Tumblr may ask for app icons during setup.
Important
In Tumblr, Blog Identifier means only your blog address, such as yourblog.tumblr.com. It is not your email address, a sentence, or a nickname.
Step-by-Step Configuration
Video tutorial: connect Tumblr step by step
Watch the recorded setup before following the written steps. It shows where to confirm your Tumblr blog, create the app keys, and paste them in Social Publisher.
1Confirm your Tumblr blog and enter the Blog Identifier
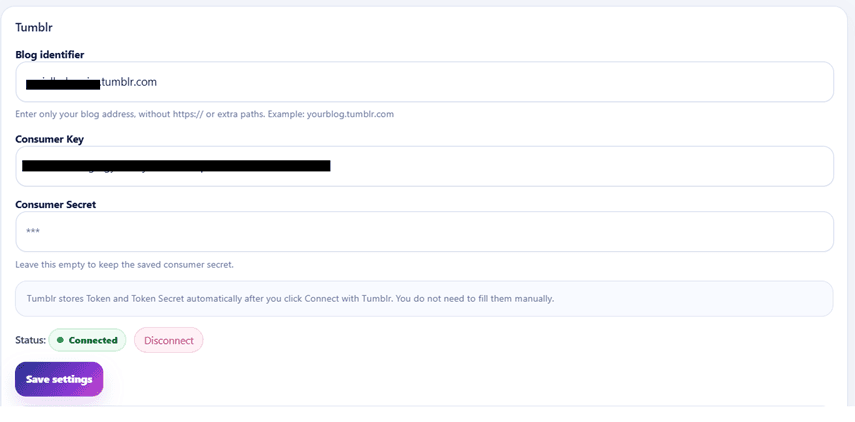
Open Tumblr and make sure you know which blog you want to connect. In Social Publisher, enter the Blog Identifier using only the host of your blog, such as yourblog.tumblr.com.
T1 — Enter the Blog Identifier exactly as your blog host.
2Create a Tumblr app
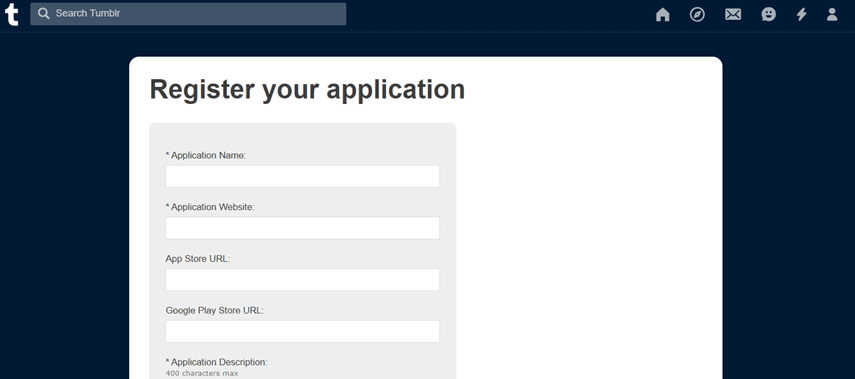
Go to tumblr.com/oauth/register and create a new app. Fill in the required basic fields such as the app name, website, description, and administrator contact email.
T2 — Complete the Tumblr app form with the required details.
3Paste the exact callback address and copy the keys
When Tumblr asks for the Callback URL and OAuth Redirect URL, paste the exact address provided by Social Publisher. Do not type it by hand. After saving the app, copy the OAuth Consumer Key and OAuth Consumer Secret into Social Publisher and save your changes.
Exact Callback URL and OAuth Redirect URLhttps://yourdomain/wp-admin/admin-post.php?action=sh_tumblr_oauth_callback
Warning
Copy the redirect address exactly. Even one missing character can stop Tumblr from returning to Social Publisher.
4Connect with Tumblr and allow access
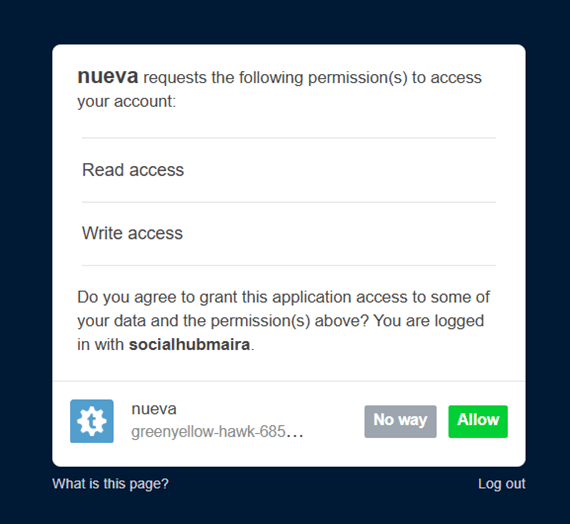
Click Connect with Tumblr inside Social Publisher. Tumblr will ask for permission to access your account. Approve the request and return to Social Publisher to finish the setup.
T3 — Allow the Tumblr permissions request.T4 — Social Publisher shows the Tumblr connection after approval.
It is connected when…
It is connected when Tumblr appears as connected inside Social Publisher and the permissions step has already been approved.
Connecting Pinterest
Pinterest needs more preparation than the other networks because the app often starts in a limited review state. Follow the steps calmly and keep in mind that the approval process can take time.
What you need
A Pinterest Business account
A Pinterest app in the developer dashboard
Your App ID, App Secret, token, and Board ID
Keep in mind
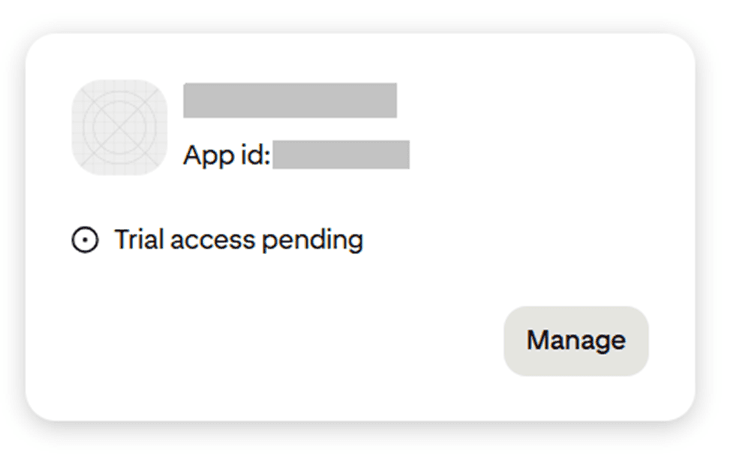
Pinterest app approval can take days after Pinterest contacts you by email.
The Redirect URI must be copied exactly from Social Publisher.
Production posting usually requires Standard Access, not only trial access.
Warning
Pinterest app approval can take days. Do not expect production publishing to work immediately after creating the app.
Important
For real production posting, Pinterest usually requires Standard Access. Trial access often lets you connect, but not publish.
Step-by-Step Configuration
Video tutorial: connect Pinterest step by step
Watch the recorded setup before following the written steps. It shows where to create your Pinterest app, configure the redirect URL, and paste the keys in Social Publisher.
1Create your Pinterest app
Open the Pinterest developer area and create a new app. Complete the required fields, such as app name, company name, website, privacy policy, purpose, use cases, and audience.
P1 — Complete the Pinterest app form and the required business details.
2Wait for approval before continuing
After creating the app, Pinterest may leave it pending until it reviews the request or contacts you by email. That is normal. Wait until the app is approved enough to continue with the next steps.
3Add the exact Redirect URI and paste the app details into Social Publisher
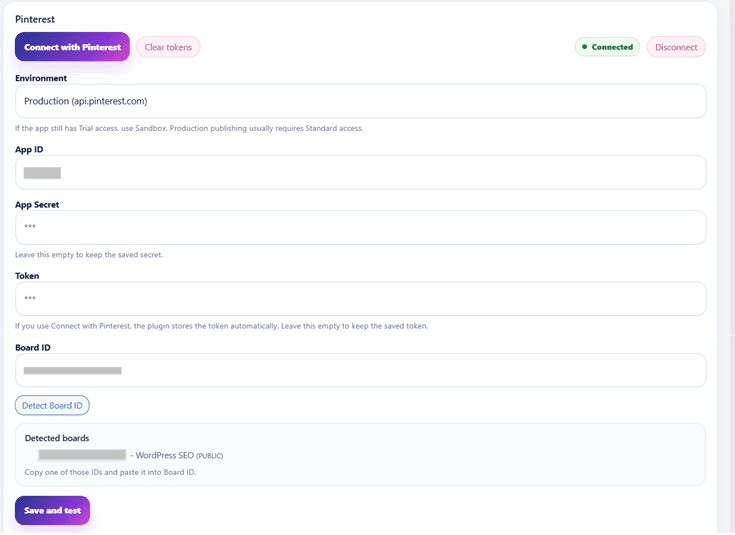
Once the app is approved, paste into Pinterest the exact Redirect URI shown by Social Publisher. Then copy your App ID and App Secret into Social Publisher. If your setup requires a token, generate it and paste it too, then save the configuration.
Do not guess the Redirect URI and do not skip saving. Pinterest is strict about exact callback details.
P2 — Add the Pinterest credentials in Social Publisher, save, detect the board, and connect.
4Detect the Board ID and connect
Before you try to finish the connection, click Detect Board ID inside Social Publisher if that button is available. After that, click Connect with Pinterest. This extra step matters because Social Publisher needs to know which board it should use.
It is connected when…
It is connected when Social Publisher saves the Pinterest connection correctly and your correct board has been detected or selected.
Connecting Threads
Threads uses Meta’s developer system, so the setup has a few extra parts. The good news is that each one has a simple purpose: create the Meta app, enable the correct permissions, add a tester account, and then connect.
What you need
Access to Meta Developers
The correct Business Portfolio
Your Threads account ready to be added as a tester
Keep in mind
A Business Portfolio is the Meta workspace that owns the app.
The app needs the Threads API product and the correct permissions.
The tester invitation must be accepted before the connection can work.
Important
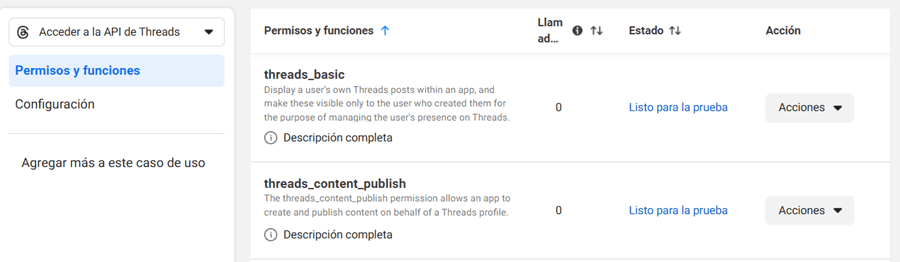
Permissions are simply the approvals Meta needs before Social Publisher can read your Threads account and publish for you. In this setup, the important ones are threads_basic and threads_content_publish.
Step-by-Step Configuration
Video tutorial: connect Threads step by step
Watch the recorded setup before following the written steps. It shows how to create the Meta app, confirm the Threads permissions, and paste the keys in Social Publisher.
1Create a Meta app for Threads
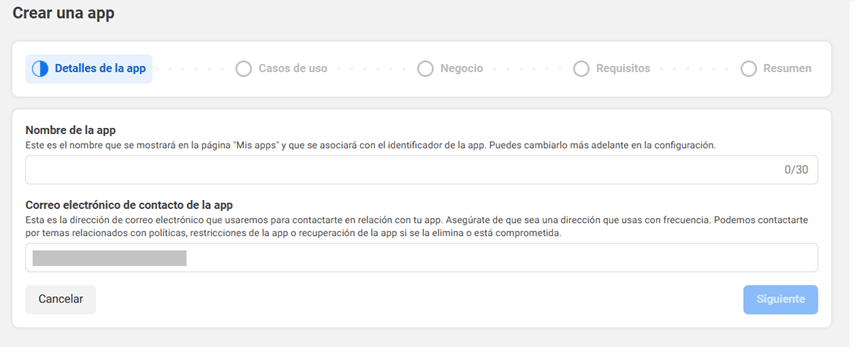
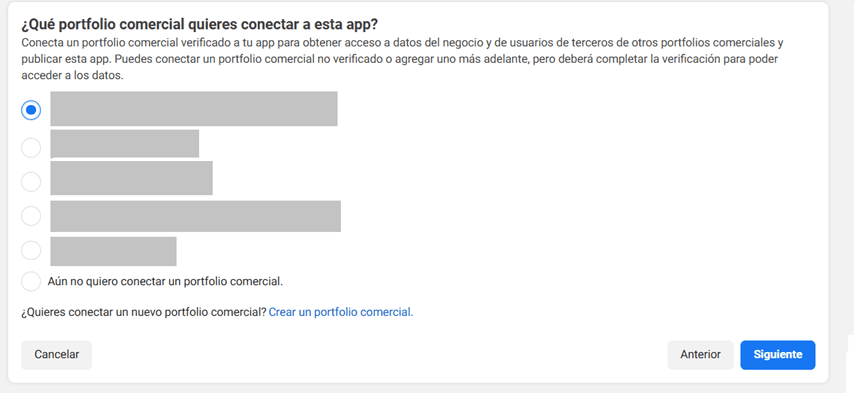
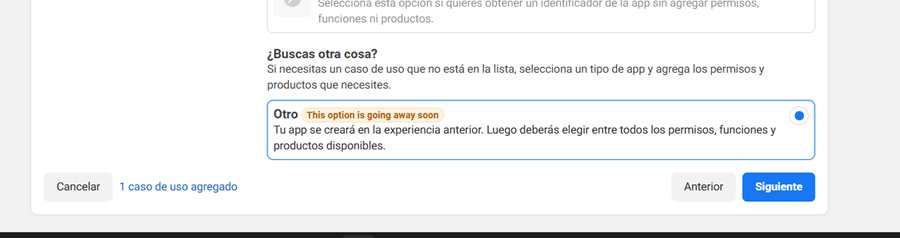
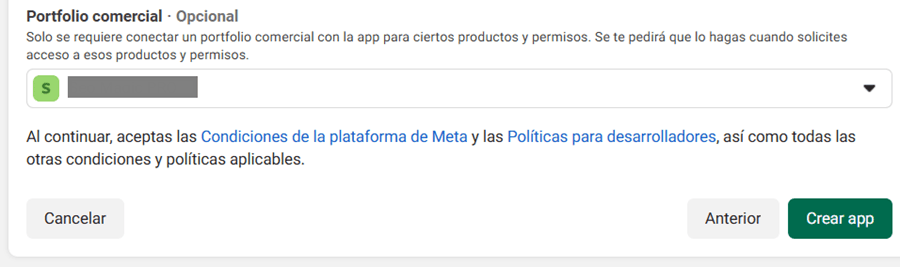
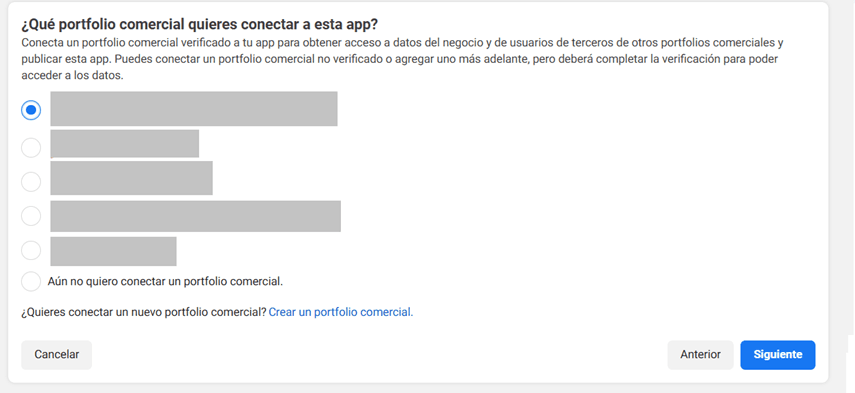
Go to Meta Developers and create a new app. During setup, choose the correct Business Portfolio. If you do not have the right business workspace yet, create it first and then continue.
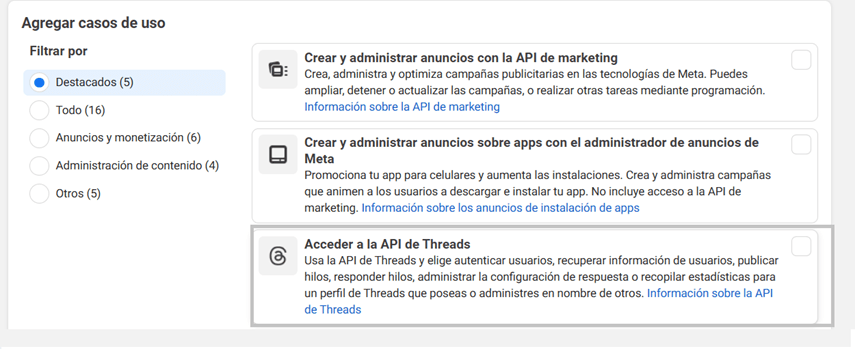
TH1 — Start a new Meta app for the Threads connection.TH2 — Choose the business workspace that should own the app.TH3 — Use the correct Business Portfolio or create one if needed.
2Add the Threads API product and confirm the app
Inside the Meta app, add the Threads API product and complete the basic confirmation screens. This tells Meta what kind of connection you are creating.
TH4 — Add and confirm the Threads setup inside the Meta app.
3Enable the required permissions and paste the Redirect URI
In the Threads settings, enable threads_basic and threads_content_publish. Then paste the exact Redirect URI shown by Social Publisher. This is the return link that sends you back to Social Publisher after approval, so it must match exactly.
Example Redirect URI format https://yourdomain/wp-admin/admin-post.php
Warning
Copy the Redirect URI exactly as it appears. A small mistake can break the return step and leave the connection unfinished.
TH5 — Enable the required Threads permissions and add the Redirect URI.
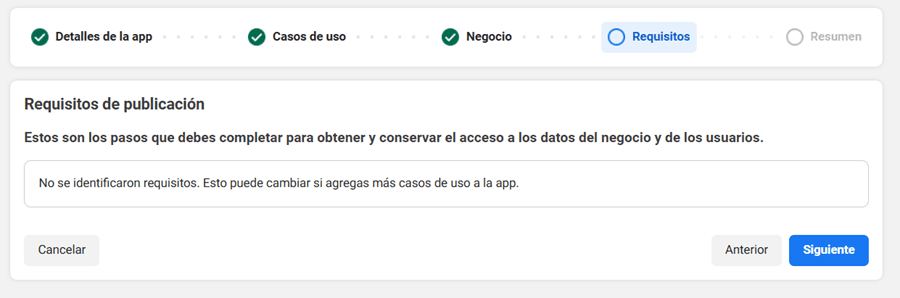
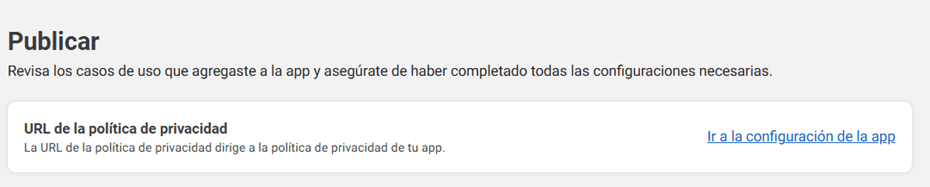
4Add a privacy policy, publish the app, and add your Threads tester
Before connecting, add a valid privacy policy in the app settings and switch the app to active or published when Meta requires it. Then open Roles, add your Threads account as a tester, and accept the invitation in Threads website permissions.
Adding the tester alone is not enough. The tester account must also accept the invitation, otherwise Social Publisher cannot finish the connection.
TH6 — Add the privacy policy and prepare the app for publishing.TH7 — Add the Threads tester and then connect from Social Publisher.
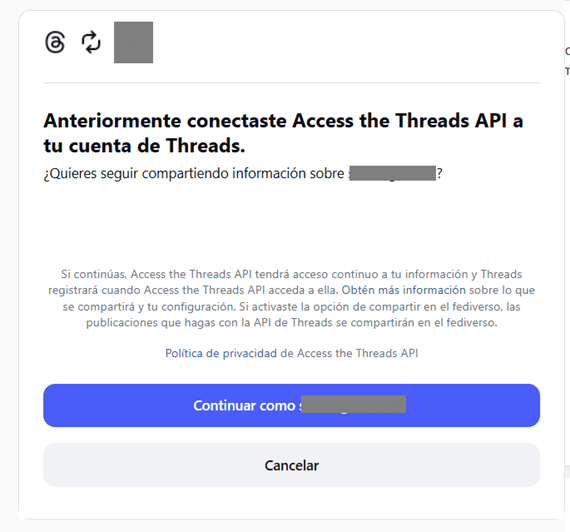
5Connect from Social Publisher
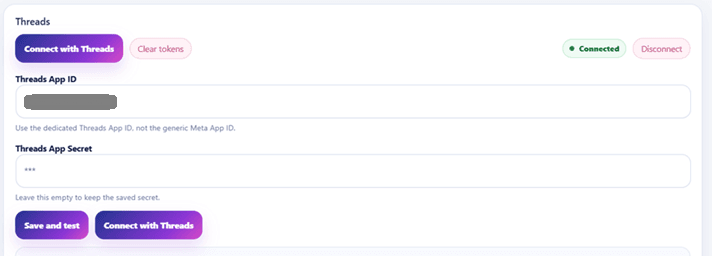
Go back to Social Publisher, enter the Threads App ID and Threads App Secret if needed, save the configuration, and click Connect with Threads. Approve the flow and return to Social Publisher.
TH8 — Social Publisher shows the Threads connection after the approval flow is complete.
It is connected when…
It is connected when Social Publisher returns correctly from Meta and the Threads account appears as connected.
Connecting Instagram
Instagram also uses Meta, but this setup is specifically designed for a business or professional connection flow. Move slowly and pay close attention to the Business Login settings and the Redirect URI.
What you will need
Access to Meta Developers
The correct Business Portfolio
An Instagram business or professional account that can be connected through Meta
Keep in mind
This connection usually depends on an Instagram business or professional setup, not on a basic personal account.
The Business Login Redirect URI must be copied exactly.
You may need tester access before the connection can be completed.
Important
In Instagram, the Redirect URI is the return address that sends Meta back to Social Publisher. Paste it exactly as Social Publisher shows it, character by character.
Step-by-Step Configuration
Video tutorial: connect Instagram step by step
Watch the recorded setup before following the written steps. It shows how to create the Meta app, configure the Redirect URI, and paste the Instagram keys in Social Publisher.
1Create a Meta app using the Business path
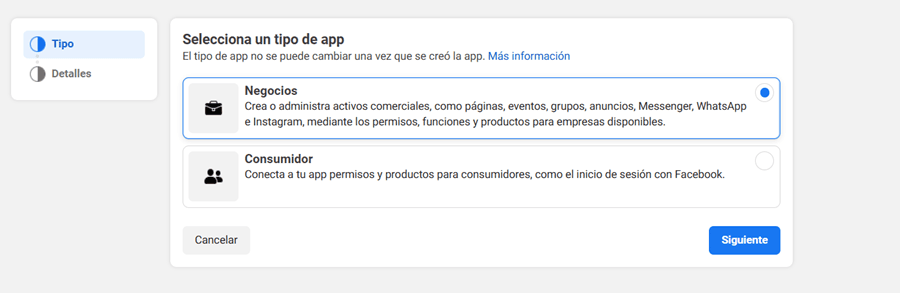
Open Meta Developers and create a new app. Choose the Other use case and then select the Business app type. When Meta asks for a Business Portfolio, choose the correct one for the account you want to connect.
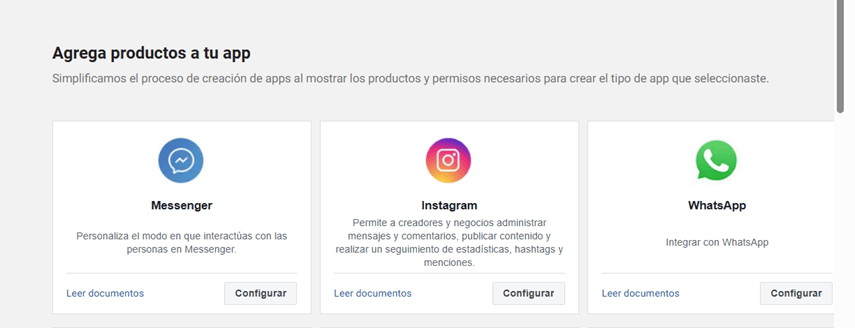
IG1 — Start the Meta app and choose the correct use case.IG2 — Choose the Business app type.IG3 — Select the Business Portfolio that should own this app.
2Add the Instagram product to the app
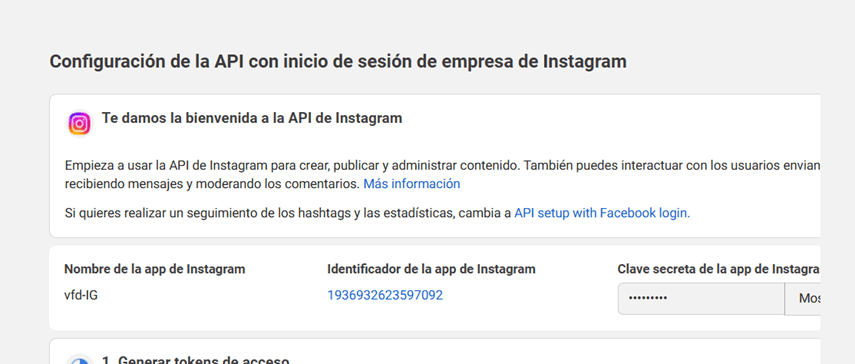
After creating the app, add the Instagram product or the Instagram login flow shown inside your Meta dashboard. Continue through the product setup screens until the Instagram connection settings are available.
IG4 — Add the Instagram product to the Meta app.IG5 — Continue through the Instagram product setup screens.
3Paste the Business Login Redirect URI exactly
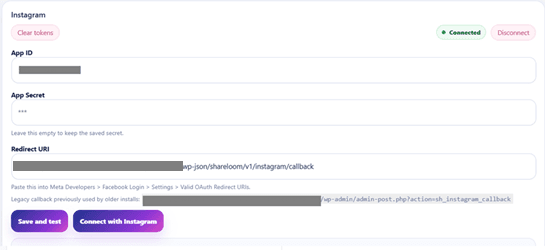
Open the Business Login settings and find the OAuth Redirect URIs field. Paste the exact callback address shown by Social Publisher. Do not change it, shorten it, or add extra characters.
Do not type the Redirect URI from memory. Copy and paste it exactly. This is one of the most common reasons an Instagram connection fails.
4Add a privacy policy, activate the app, and accept tester access
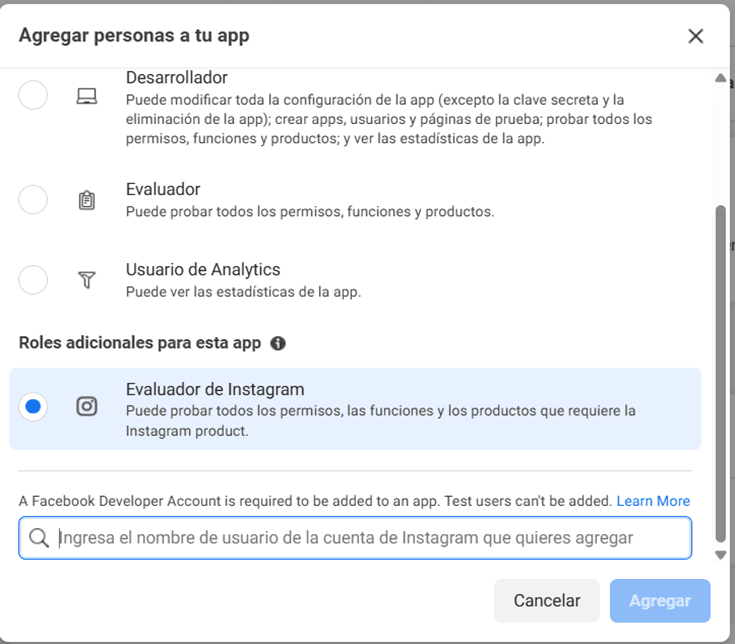
Add a valid privacy policy in the app basic settings. When Meta requires it, switch the app to active or live mode. Then add your Instagram account as a tester and accept the invitation from the Instagram access screen before you continue.
IG6 — Accept tester access and make sure the app setup is ready.
5Enter the app details in Social Publisher and connect
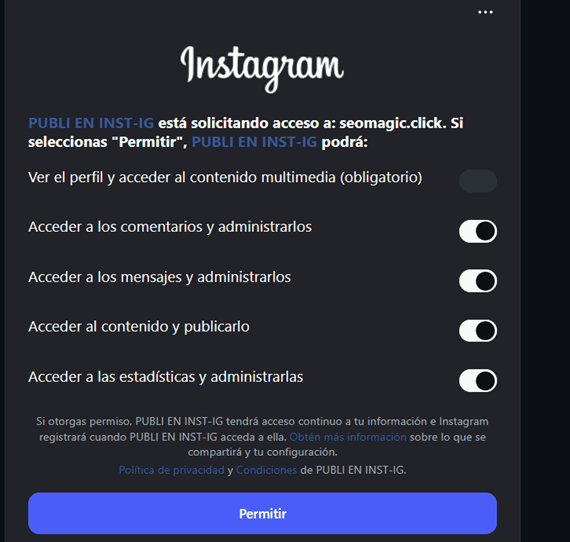
Paste the App ID and App Secret into Social Publisher, click Save & Test, and then click Connect with Instagram. Approve the connection flow and return to Social Publisher.
IG7 — Paste the Instagram app details into Social Publisher and start the connection.IG8 — Social Publisher shows the Instagram connection after approval.
It is connected when…
It is connected when Social Publisher returns from Meta and your Instagram account appears as connected and ready to use.
Connecting LinkedIn
LinkedIn is one of the simplest setups. Create a LinkedIn app, add the exact Redirect URI, paste the client details into Social Publisher, and approve the connection.
What you will need
Access to LinkedIn Developers
Your Client ID and Client Secret
The exact Redirect URI shown inside Social Publisher
Keep in mind
This Social Publisher connection is for personal LinkedIn profiles only.
This version does not publish to company pages.
The Redirect URI must be added in LinkedIn exactly as Social Publisher shows it.
Warning
This LinkedIn connection is only for personal profiles. It does not publish to company pages or business pages inside Social Publisher.
Step-by-Step Configuration
Video tutorial: connect LinkedIn step by step
Watch the recorded setup before following the written steps. It shows how to create the LinkedIn app, configure the authorized redirect URL, and paste the client details in Social Publisher.
1 Create a LinkedIn app and open the Auth settings
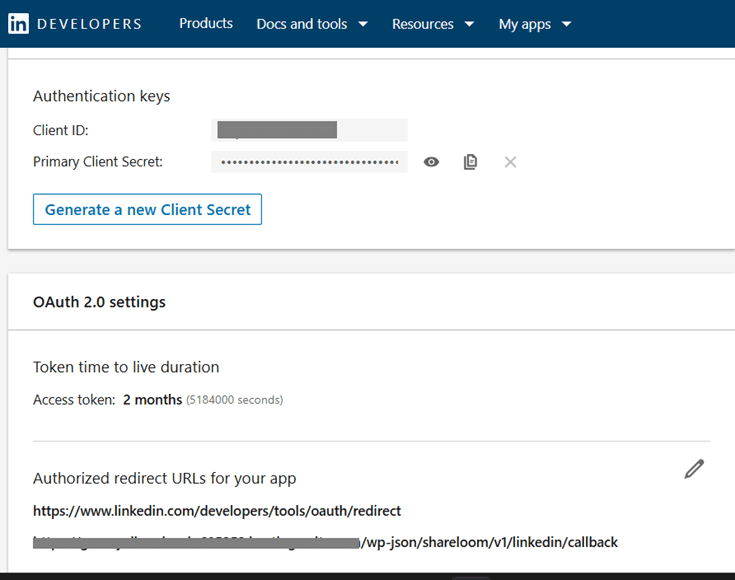
Open LinkedIn Developers, create your app, and go into the Auth section. That is where LinkedIn shows the client details and where you add the authorized return address.
LI1 — Create the LinkedIn app, copy the client details, and add the Redirect URI.
2 Copy the Client ID and Client Secret, then add the Redirect URI
Copy the Client ID and Client Secret from LinkedIn into Social Publisher. Then copy the Redirect URI from Social Publisher and paste that exact same address into the authorized redirect URLs inside LinkedIn.
Common error
The redirect address must match in both places: Social Publisher and LinkedIn. If they are different, even slightly, the approval flow will fail.
3 Save, connect, and approve
Save the settings in Social Publisher first so the client details are stored. Then click Connect with LinkedIn and approve the access request in LinkedIn. If Social Publisher shows a button such as Use connected profile, select it so the correct personal profile is filled in automatically.
You are connected when…
Social Publisher returns from LinkedIn and shows your personal profile as the connected destination.
Connecting Blogger
Blogger uses Google Cloud Console, which can look technical at first. In practice, you only need to create a project, enable the Blogger API, create a web credential, paste the Redirect URI, and then connect with Google.
What you will need
Access to Google Cloud Console
A Google account with access to the Blogger blog
The exact Blogger Redirect URI shown by Social Publisher
Keep in mind
Google Cloud Console may ask you to configure the consent screen before the client can be used.
The application type must be Web application.
If Google requires it, switch the app to production before connecting.
Important
The Redirect URI in Google Cloud must exactly match the one provided by Social Publisher. Also, make sure you enable the Blogger API in the Library, or the connection will fail.
Step-by-Step Configuration
Video tutorial: connect Blogger step by step
Watch the recorded setup before following the written steps. It shows how to create the Google Cloud project, enable the Blogger API, configure OAuth, and paste the credentials in Social Publisher.
1 Create a new Google Cloud Project
Go to the Google Cloud Console, log in with the same Google account that owns the blog, and create a new project. Give it a name you will remember, like Social Publisher Blogger Connection.
Inside your new project, navigate to “APIs & Services” > “Library”. Search for “Blogger API v3” and click Enable. Without this, Social Publisher won’t be allowed to post.
3 Setup OAuth Consent Screen
Go to “OAuth consent screen” in the menu. Choose “External” and click Create. Fill in the required fields (App name, User support email, and Developer contact information). Save and continue through the remaining steps.
Note: Once completed, you may need to click “Publish App” so it changes from Testing to In Production.
4 Create Credentials and Add Redirect URI
Navigate to “Credentials” > “Create Credentials” > “OAuth client ID”. Choose “Web application” as the Application type. Under “Authorized redirect URIs”, paste the exact Callback URL given by Social Publisher.
Be very precise. If you add a trailing slash in Social Publisher but omit it in Google Cloud, the connection will fail.
5 Enter details in Social Publisher and Connect
Copy the Client ID and Client Secret from Google Cloud into Social Publisher. Save your settings, and click “Connect with Blogger”. You’ll be asked to log in to Google and grant access. After you return, select the Blog you wish to post to.
It is connected when…
It is connected when Social Publisher returns from Google, displays your Google account as connected, and your target blog is successfully selected.
Connecting Telegram
Telegram publishes through a bot. Create a bot with BotFather, add it to your group or channel, and paste the Bot Token plus the destination ID into Social Publisher.
What you will need
A Telegram account
A Bot Token created with BotFather
The public @username or numeric chat ID of the group/channel
Admin posting permission for channels
Keep in mind
Public destinations can use @yourchannel or a t.me link.
Private groups and channels usually need a numeric ID starting with -100.
Topic ID is optional and only applies to forum-style group topics.
Important
Add the bot to the destination before testing. For channels, make the bot an administrator with permission to post messages. Keep the Bot Token private.
Step-by-Step Configuration
Video tutorial: connect Telegram step by step
Watch the recorded setup before following the written steps. It shows how to create the bot with BotFather, copy the token, enter the destination, and test the connection in Social Publisher.
1Open Telegram and search for BotFather.
BotFather is the official Telegram bot used to create and manage bots.
Search for the official BotFather account in Telegram and open the verified result.
2Create a new bot with /newbot.
Choose a name and username, then copy the Bot Token exactly as Telegram shows it.
Send /newbot, then enter the public name or username you want for the bot.Copy the Bot Token from BotFather and keep it private.
3Add the bot to your group or channel.
For a channel, open administrators and give the bot permission to post messages.
4Copy the destination ID.
Use @yourchannel for public destinations, a t.me link, or the numeric chat ID for private groups/channels.
5Paste the Bot Token and Group / Channel ID in Social Publisher.
Only fill Topic ID if you want to publish inside a specific Telegram forum topic.
Paste the Bot Token and the Group / Channel ID in Social Publisher, then save and test.
6Click Save and test.
When the test passes, Telegram is ready for manual publishing and Gutenberg auto-post.
When the test succeeds, Telegram changes to Ready to publish.
You are connected when…
Social Publisher confirms the bot and destination, and the Telegram status changes to connected.
Connecting Facebook
Facebook also uses Meta, but the final destination is a Facebook Page. The key idea is simple: create the right Meta app type, give it the Page permissions it needs, connect your Facebook account, and choose the correct Page.
What you will need
Access to Meta Developers
The correct Business Portfolio
Access to the Facebook Page you want to publish to
Keep in mind
Permissions are the approvals that let Social Publisher see your Pages and publish to the one you select.
The correct business workspace and Page roles do matter.
You must choose the Page after the Facebook approval flow.
Important
If Social Publisher cannot find your Facebook Pages, the most common causes are missing Page permissions, the wrong Business Portfolio, or not having the correct role on the Page.
Step-by-Step Configuration
Video tutorial: connect Facebook step by step
Watch the recorded setup before following the written steps. It shows how to create the Meta app, configure Page permissions, and connect the Facebook Page in Social Publisher.
1Create the Meta app for Facebook Pages
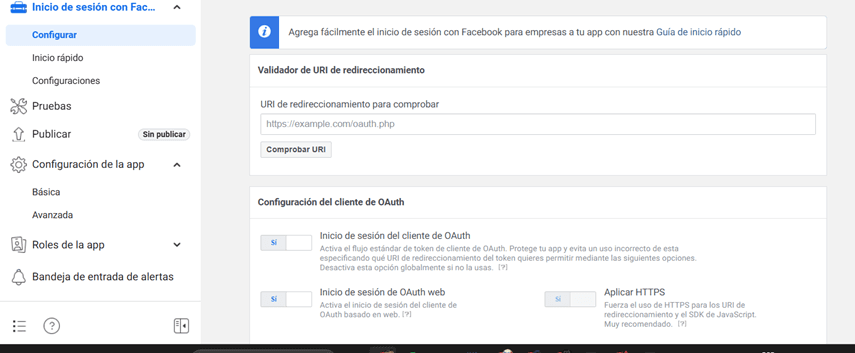
Go to Meta Developers and create a new app. Choose the use case that manages all aspects of your Page and then continue through the setup screens.
FB1 – Choose the Facebook Page management use case when creating the app.
2Use the correct Business Portfolio and enable Page permissions
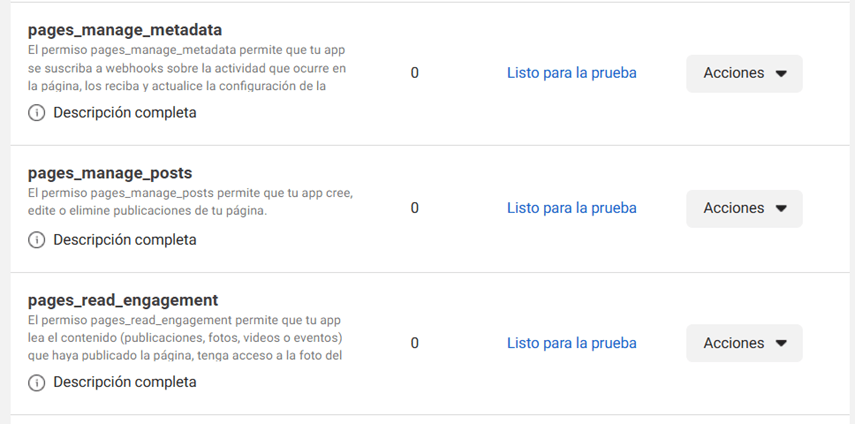
When Meta asks for the Business Portfolio, select the one that owns or manages the Page you will use. If the dashboard asks for permissions, enable the ones needed for Page access and publishing, such as pages_show_list, pages_read_engagement, pages_manage_posts, and pages_manage_metadata.
FB2 – Add the required Page permissions in the Meta app.FB3 – Continue the Facebook app configuration with the Page permissions enabled.FB4 – Make sure the correct Business Portfolio is selected.
3Add the exact Redirect URI and the privacy policy
Copy the Facebook Redirect URI from Social Publisher and paste it into the Meta app exactly as shown. Also add a valid privacy policy in the basic app settings and publish the app when Meta requires it. Paste the exact Redirect URI that Social Publisher shows you. Do not type it by hand.
Do not skip the privacy policy or publication step when Meta requires them. The connection may appear to start correctly and still fail before you can choose the Page.
FB5 – Complete the Meta app configuration before the connection flow.FB6 – Add the Redirect URI exactly as Social Publisher shows it.
4Paste the App ID and App Secret into Social Publisher
Copy the Facebook App ID and the App Secret from Meta into Social Publisher and save the configuration. This stores the app details before the connection flow starts.
5Connect Facebook and choose the correct Page
Click Connect with Facebook inside Social Publisher and follow Meta’s approval screens. When Facebook shows your available Pages, choose the one you want Social Publisher to use. This final selection matters because Social Publisher can only publish to the Page you choose there.
Common error
Choosing the wrong Page is a very common mistake, especially when the same Facebook account manages several Pages.
It is connected when…
It is connected when Social Publisher shows the selected Facebook Page as the connected publishing destination.
Connecting YouTube / ShortsPRO
YouTube and YouTube Shorts use one Google OAuth connection and one YouTube channel. Configure the Google project once, then Social Publisher can upload regular videos and eligible Shorts through the same connection.
What you will need
A Google account with access to the YouTube channel
A Google Cloud project where you can enable the YouTube Data API
Permission to configure an OAuth consent screen and OAuth client
Keep in mind
YouTube and Shorts do not use separate connections.
Copy the Redirect URI from Social Publisher exactly.
Offline access is required so scheduled uploads can continue.
Important
Google may restrict uploads to private while an API project is unverified or still in testing. Shorts are identified by the video format; there is no separate Shorts API switch.
Step-by-Step Configuration
Video tutorial coming soon
The written guide below is complete and matches the current Social Publisher Pro connection screen. A recorded walkthrough will be added to this page later.
1Create or select a Google Cloud project
Open Google Cloud Console with the Google account that will own the API credentials. Create a project or select an existing project dedicated to Social Publisher.
In APIs & Services, enable YouTube Data API v3 for that project. Without this API the channel connection and uploads cannot work.
3Configure OAuth and create a Web application client
Configure the OAuth consent screen, then create OAuth credentials of type Web application. If the consent screen is in testing, make sure the Google account you will connect is allowed as a test user when Google requires it.
4Register the exact Redirect URI from Social Publisher
Open Social Publisher → Connections → YouTube / Shorts. Copy the Redirect URI shown there and add it to the Google OAuth client as an Authorized redirect URI. Do not type or modify it.
5Save the Client ID and Client Secret
Copy the Google Client ID and Client Secret into Social Publisher and save the credentials.
6Connect with Google and test the channel
Click Connect with Google, approve the requested access for the correct YouTube channel, then use Test connection. Finally choose the default privacy, audience, category, and notification preferences.
It is connected when…
Social Publisher shows the YouTube channel as connected and Test connection succeeds.
Connecting DiscordPRO
Discord uses an incoming webhook from the text channel where you want Social Publisher to post. You do not need to create a Discord bot or an OAuth application.
What you will need
A Discord server and destination text channel
Permission to manage webhooks in that server or channel
The complete webhook URL generated by Discord
Keep in mind
A Discord webhook URL is a secret: anyone who has it can post to that channel.
Choose the destination channel while creating the webhook.
If you regenerate or delete the webhook in Discord, replace the saved URL in Social Publisher.
Important
Never publish or share the webhook URL. Social Publisher masks the saved token after it is stored.
Step-by-Step Configuration
Video tutorial coming soon
The written guide below is complete and matches the current Social Publisher Pro connection screen. A recorded walkthrough will be added to this page later.
1Open the destination Discord server
Open the server and make sure your account is allowed to manage webhooks for the destination channel.
2Open Integrations and Webhooks
Go to Server Settings → Integrations → Webhooks, or open the destination channel settings and choose Integrations.
3Create a webhook for the correct channel
Create a new webhook, give it a recognizable name such as Social Publisher, and select the text channel where publications should appear.
4Copy the webhook URL
Use Copy Webhook URL in Discord. Treat this URL like a password and do not expose it publicly.
Open Social Publisher → Connections → Discord, paste the complete webhook URL, save it, and click Send test message. Confirm that the test arrives in the intended channel.
It is connected when…
Social Publisher shows the Discord webhook as saved and the test message arrives in the selected channel.
Connecting Remote WordPressPRO
Remote WordPress lets Social Publisher create posts or pages on another WordPress site through the REST API. It uses a WordPress Application Password, never the user’s normal account password.
What you will need
A public remote WordPress site running over HTTPS
A WordPress user on that site with permission to create or publish the required content
An Application Password created for that WordPress user
Keep in mind
Use the site root URL, for example https://example.com — not /wp-admin or /wp-json.
The username must belong to the same user that created the Application Password.
Application Passwords can be revoked later without changing the normal WordPress password.
Important
If Application Passwords are missing or a test returns 401/403, check HTTPS, security plugins, hosting rules, and whether a proxy is stripping the Authorization header.
Step-by-Step Configuration
Video tutorial coming soon
The written guide below is complete and matches the current Social Publisher Pro connection screen. A recorded walkthrough will be added to this page later.
1Open the remote WordPress dashboard
Sign in to the WordPress site where Social Publisher should create content, using the user you want to authorize.
2Create an Application Password
Go to Users → Profile (or edit the chosen user), find Application Passwords, enter a name such as “Calliope Social Publisher”, and create the password.
3Copy the generated password immediately
WordPress displays the new Application Password only once. Copy it before leaving the screen. Do not use the normal WordPress login password.
4Add the remote account in Social Publisher
Open Social Publisher → Connections → Remote WordPress. Add a label, the public HTTPS site root, the WordPress username, and the Application Password. Choose the default post type and status.
5Save, test, and refresh taxonomies
Save the account and click Test connection. When it succeeds, use Refresh categories and tags if you need the remote taxonomy IDs before publishing.
It is connected when…
The account is marked ready to publish and Test connection succeeds against the remote WordPress REST API.
Connecting a Custom WebhookPRO
Custom Webhook sends a stable JSON payload to your own automation or integration endpoint. You can configure up to 20 public HTTPS endpoints and optionally protect them with Bearer, Basic, or HMAC SHA-256 authentication.
What you will need
A public HTTPS endpoint that can receive POST requests
Access to the receiving service so you can verify the test payload
Authentication credentials or a shared secret if your endpoint requires them
Keep in mind
Private-network destinations and redirects are rejected for security.
Use HMAC SHA-256 when you want the receiver to verify that the payload came from your configured secret.
For HMAC, use a random secret of at least 32 characters.
Important
Do not use an internal/private URL. The endpoint must be reachable publicly over HTTPS and should validate authentication before accepting production data.
Step-by-Step Configuration
Video tutorial coming soon
The written guide below is complete and matches the current Social Publisher Pro connection screen. A recorded walkthrough will be added to this page later.
1Prepare the receiving endpoint
Create or choose the HTTPS endpoint in your automation platform, custom application, or webhook receiver. Make sure it accepts incoming POST requests.
2Add the endpoint to Social Publisher
Open Social Publisher → Connections → Custom Webhook. Add a clear label and paste the full public HTTPS endpoint URL.
3Choose the authentication method
Select None, Bearer, Basic, or HMAC SHA-256. Enter the required username or secret. For HMAC, use a strong random secret of at least 32 characters.
4Save and keep the endpoint enabled
Save the endpoint. Social Publisher stores sensitive values privately and masks them instead of displaying the full saved secret.
5Test the endpoint and verify the JSON
Click Test endpoint and confirm on the receiving side that the request arrived successfully. Once the test works, the endpoint is ready to be selected as a publishing destination.
It is connected when…
Test endpoint succeeds and the receiving service confirms that the Social Publisher JSON payload arrived.