
How to Migrate Your WordPress Media Library Without Losing Images or Metadata
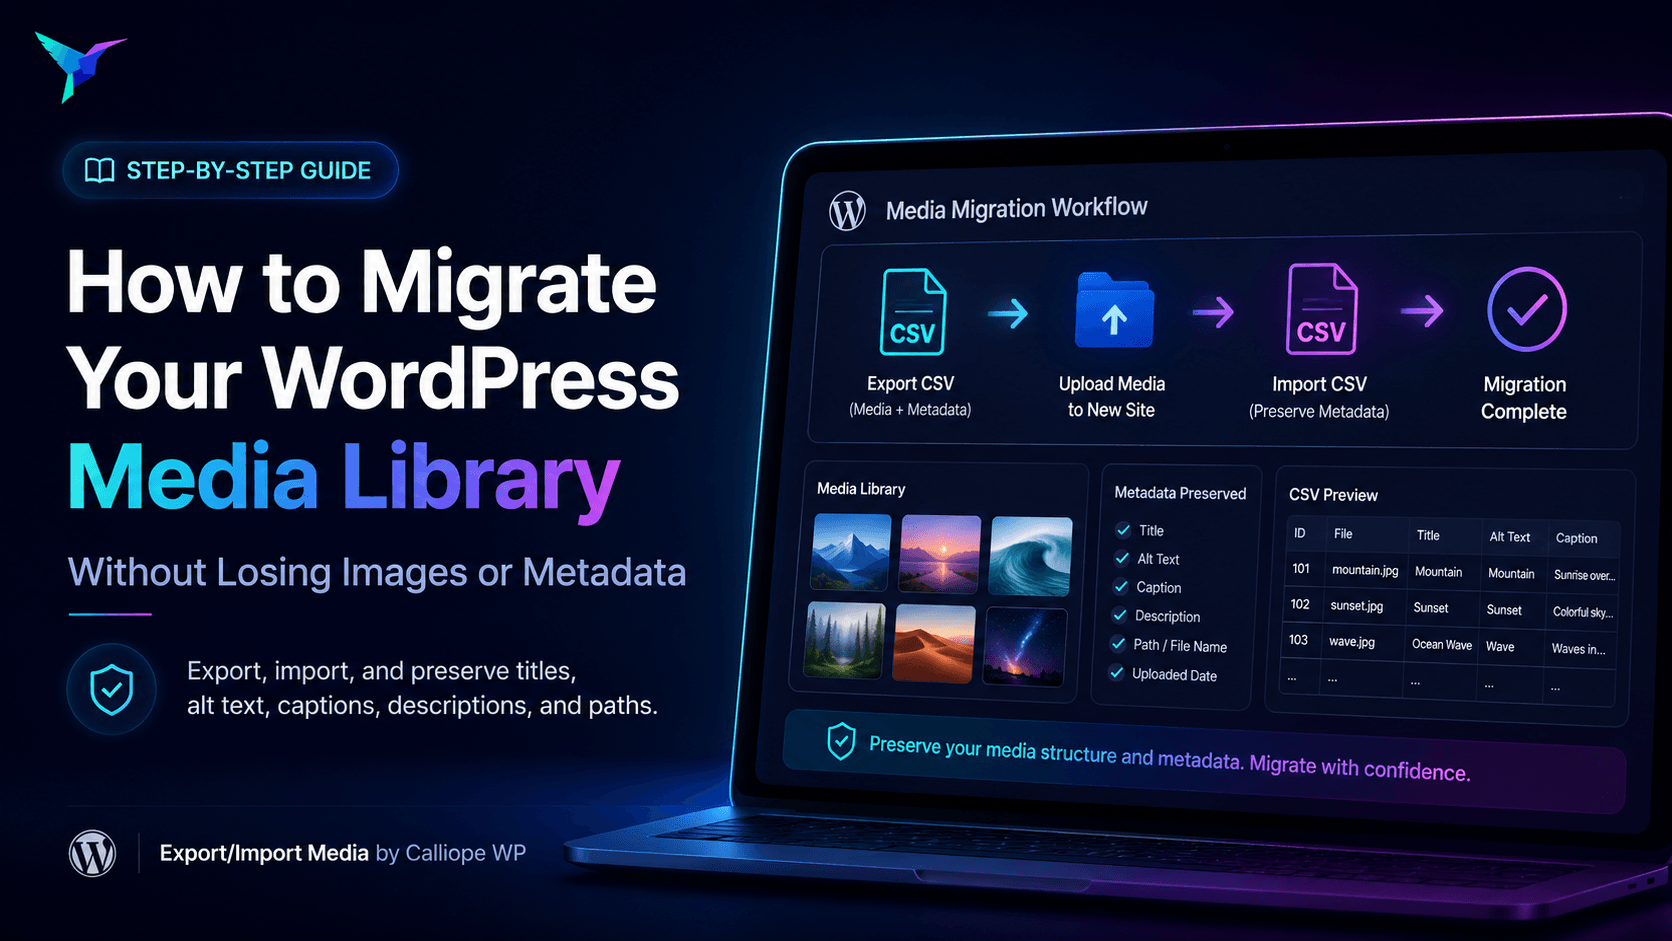
Migrating a WordPress website is not only about moving posts, pages, themes, and plugins. The Media Library can be one of the easiest parts of a migration to underestimate—and one of the most frustrating to repair when something goes wrong.
A WordPress media item is more than a JPG, PNG, PDF, video, or other file inside wp-content/uploads. WordPress also keeps an attachment record for that file and associates information such as its title, alternative text, caption, description, upload path, and generated image data with it.
If you migrate only the physical files, you can end up with images that exist on the server but do not appear correctly in the Media Library. If you move only database records without making the corresponding files available, WordPress can retain attachment entries that point to missing assets.
The safest approach is to treat a media migration as a structured transfer of both files and attachment data.
In this guide, you will learn how to migrate a WordPress Media Library without losing images or important metadata, how to preserve upload paths, how to avoid duplicate attachments, and how to verify the result before considering the migration complete.
Why WordPress Media Library Migrations Can Go Wrong
WordPress stores uploaded media in two connected layers: the physical files on the server and the attachment information registered in WordPress.
For images, WordPress can also maintain generated image sizes and attachment metadata related to dimensions, file location, and other image information. This is why simply copying the uploads folder is not always the same as migrating the Media Library itself.
Common migration problems include:
- Images copied to the server but missing from the WordPress Media Library.
- Attachments registered in WordPress while the original files are missing.
- Broken image URLs after changing domains or environments.
- Lost alt text, titles, captions, or descriptions.
- Duplicate attachments created during repeated imports.
- Old year/month folder structures being flattened or changed.
- Large imports timing out before the full library is processed.
- Existing media being overwritten when the goal was only to migrate new files.
These issues become especially expensive on content-heavy websites, WooCommerce stores, publishing sites, client portfolios, or agency projects with thousands of attachments.
What Should Be Preserved During a WordPress Media Migration?
A good media migration should preserve more than the original file.
Depending on your site and migration method, you may need to preserve:
- The original media file.
- The relative upload path.
- The attachment title.
- Alternative text.
- The caption.
- The description.
- The relationship between the imported file and its WordPress attachment record.
- Enough source information to detect files that have already been imported.
Alt text is particularly important when images have already been reviewed for accessibility or SEO. Rebuilding it manually after a migration can turn a technical task into hours of unnecessary editorial work.
The same applies to captions and descriptions on sites where the Media Library contains editorial, product, archive, or attribution information.
A CSV-Based Way to Migrate the WordPress Media Library
Export/Import Media by Calliope WP provides a CSV-based workflow for exporting media information from WordPress and importing media into another WordPress installation.
The free version is available from the official WordPress.org plugin directory and is designed for standard media exports, one-time migrations, new media imports, duplicate prevention, metadata mapping, relative paths, and batch processing.
Instead of treating the Media Library as a folder of unrelated files, the CSV acts as a readable migration manifest. Each row can carry the media location together with the metadata WordPress needs to recreate the attachment.
This also gives agencies and developers a migration file that can be inspected before the destination site is changed.
Step 1: Back Up the Source and Destination Sites
Before migrating media, create a reliable backup of both environments.
A media migration can involve hundreds or thousands of attachments, so it should be treated like any other production change. If the destination site already contains media, the backup is especially important because you need a known recovery point before importing new attachments.
For a staging-to-production migration, also confirm which site is authoritative. You do not want to import an older staging library over newer production content by mistake.
Step 2: Export the WordPress Media Library to CSV
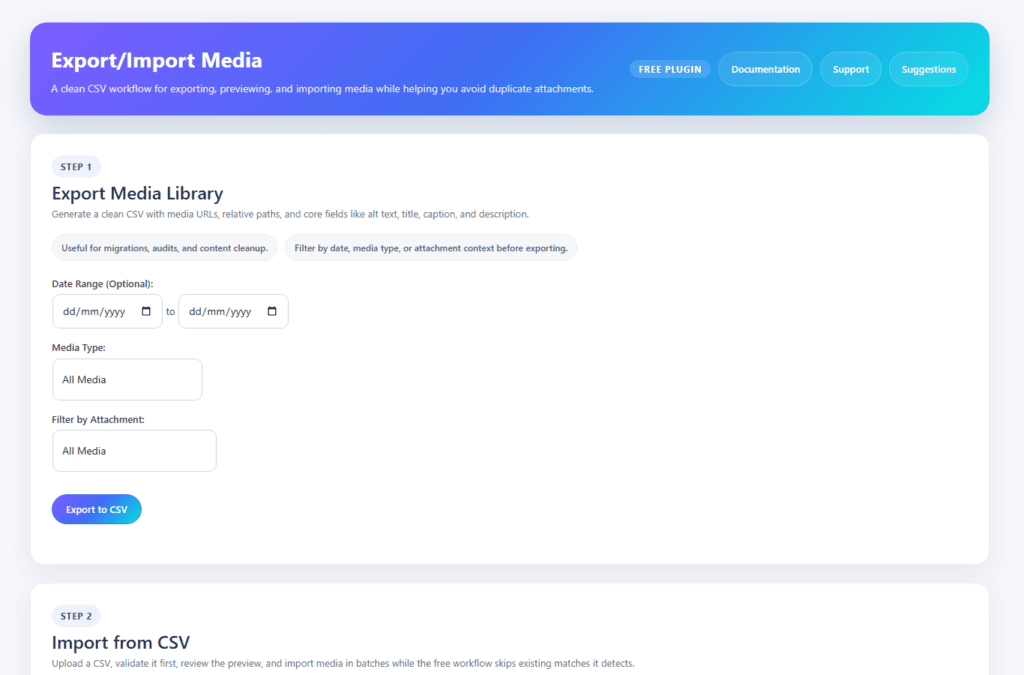
Install and activate Export/Import Media on the source WordPress site, then open the plugin’s export screen.
The export can include Media Library data in CSV format, with filters that help reduce the migration to the files you actually need. Depending on the library, you can filter by date range, media type, and attachment context.
The resulting CSV gives you a structured list of media records rather than forcing you to work from filenames alone.
For a full migration, export the complete set of media you intend to move. For a partial migration, use filters carefully and verify that the resulting file contains the expected attachments before continuing.
Step 3: Review the CSV Before Importing Anything
One of the main advantages of a CSV workflow is that the migration can be reviewed before it changes the destination Media Library.
Check the columns for:
- Media URL or source location.
- Relative path when used.
- Title.
- Alt text.
- Caption.
- Description.
Look for unexpected empty values, malformed URLs, incorrect paths, duplicate rows, or spreadsheet changes that may have altered the CSV structure.
This is also a useful moment to review metadata quality. If the source library contains empty or inaccurate titles and alt text, fixing those values before a migration can be more efficient than rebuilding the library first and cleaning it later.
Step 4: Decide How the Destination Will Access the Files
There are two common migration scenarios.
Remote Media Import
If the source files are publicly accessible, the destination WordPress site can import media using their URLs. During a standard remote import, the file is downloaded and registered as a new WordPress attachment.
Before starting, open a few source media URLs in a private browser window. If the files require a login or are blocked by a firewall, maintenance mode, hotlink protection, or another access rule, the destination server may not be able to download them.
Local Import Mode
If the physical files have already been copied to the destination server using SFTP, SSH, a hosting file manager, rsync, or another server-level method, you do not necessarily need to download the same files again.
Export/Import Media includes a Local Import Mode that can register files that already exist inside the WordPress uploads directory. This can be particularly useful for large libraries or migrations where moving the files separately is faster than transferring them one by one through HTTP.
Step 5: Preserve the Original Upload Folder Structure
Many WordPress websites organize uploads into year and month folders such as:
/wp-content/uploads/2024/11/
/wp-content/uploads/2025/03/
/wp-content/uploads/2026/08/
When migrating an established site, preserving those relative paths can help keep the library organized and reduce unnecessary changes to legacy media locations.
Export/Import Media can read relative paths from the CSV and honor the existing folder structure when the migration scenario supports it.
This is particularly valuable for older sites, archives, and client projects where media has accumulated over many years.
Step 6: Validate and Preview the Media Import
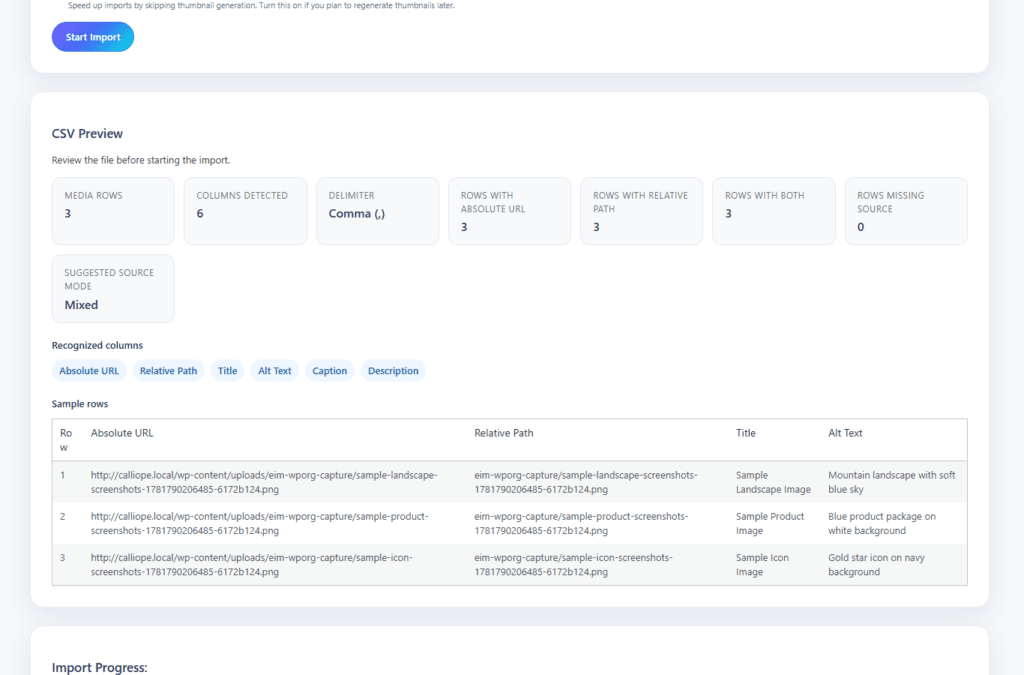
Do not start a large import immediately after uploading the CSV.
First validate the file and review the preview. The preview gives you an opportunity to confirm that the CSV columns are being interpreted correctly and that the media rows contain the expected paths and metadata.
This is where you should stop if:
- The source URLs are incorrect.
- Relative paths do not match the destination structure.
- Important metadata columns are missing.
- The CSV appears to use the wrong delimiter or encoding.
- The number of rows is very different from what you expected.
Fixing a CSV before import is much easier than cleaning up hundreds of incorrect attachments afterward.
Step 7: Import Media in Controlled Batches
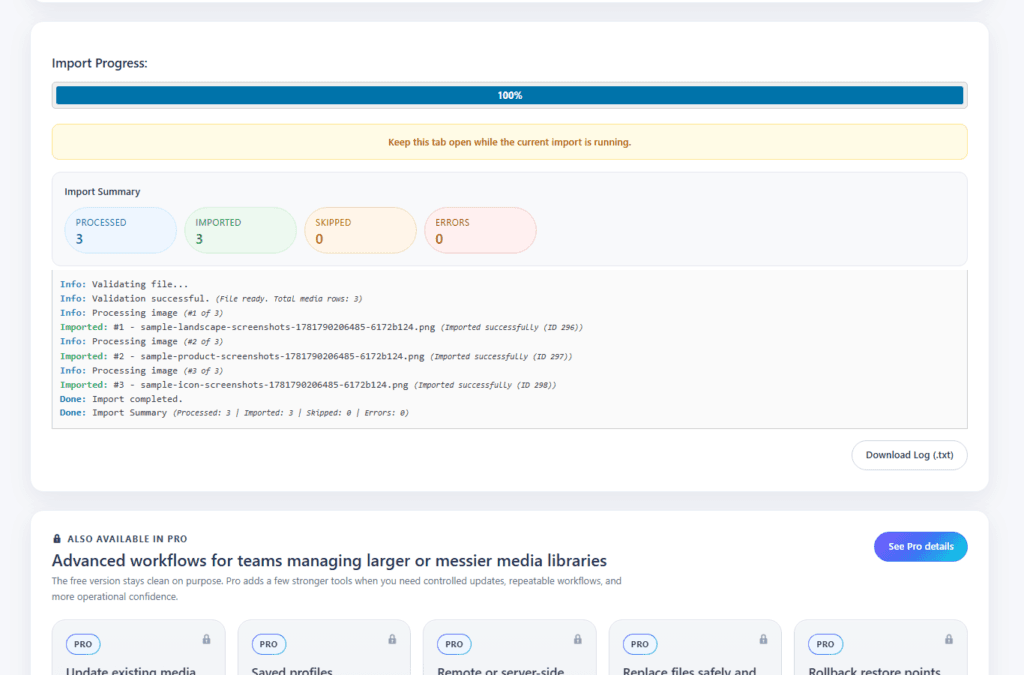
Large WordPress Media Libraries can put significant pressure on shared hosting when every file is downloaded, registered, and processed in a single request.
The free plugin processes imports in smaller browser-driven batches to reduce timeout risk. Keep the browser tab open while the free import is running and avoid putting the computer to sleep before the process finishes.
For larger or recurring migrations, Export/Import Media Pro adds background queue processing so supported jobs do not have to depend on an open browser tab.
Whichever workflow you use, do not judge success only by the final progress percentage. Review the import results and log as well.
Step 8: Prevent Duplicate Media Attachments
Duplicate files are a common problem during media migrations, especially when an import is restarted or part of the destination library already exists.
In the standard free workflow, Export/Import Media checks for existing matches and skips detected duplicates instead of creating another attachment for the same media.
This makes repeated or partial migration attempts safer, but you should still review the destination library after the import. Two files with similar names are not always the same asset, and duplicate detection should support your migration process rather than replace verification.
Step 9: Verify Images and Metadata on the Destination Site
A migration is not complete when the import says “finished.” It is complete when the destination website is working correctly.
After the import, check a representative sample of media items and confirm:
- The original file opens correctly.
- The attachment appears in the WordPress Media Library.
- The title was preserved.
- Alt text was preserved.
- The caption was preserved where present.
- The description was preserved where present.
- The expected upload path is being used.
- Important posts and pages display their images correctly.
On WooCommerce sites, also check representative product pages and galleries. Importing attachments into the Media Library is not the same as automatically rebuilding every product-gallery relationship, so verify the front end rather than assuming that every contextual relationship has been recreated.
Video: Export and Import the WordPress Media Library with a CSV
If you prefer to see the workflow before running your migration, this Calliope WP tutorial demonstrates how to export and import a WordPress Media Library using a CSV file.
What If You Need to Update Existing Media Instead of Importing New Files?
A migration and a bulk update are not always the same operation.
The standard free workflow is designed to import new media and skip detected duplicates. It does not overwrite existing attachments just because a matching row appears in the CSV.
If your goal is to update media that already exists on the destination site—for example, changing only alt text, titles, captions, or descriptions—Export/Import Media Pro provides controlled existing-media update workflows and selected-field updates.
That distinction matters for agencies. A migration should not silently become a mass metadata overwrite.
When Agencies and Developers Need a More Advanced Migration Workflow
For a small site, a one-time CSV export and import may be enough. Agency migrations and large production libraries often need additional safeguards.
Export/Import Media Pro adds workflows designed for more repeatable media operations, including:
- Updating existing media metadata.
- Updating only selected metadata fields.
- Controlled matching for existing attachments.
- Replacing physical files while keeping the attachment ID in supported workflows.
- Restore points and rollback for supported imports.
- Background queue processing for larger jobs.
- Saved export profiles and import workflows.
- History and downloadable logs.
- Image conversion to WebP or AVIF where WordPress and the server support the selected format.
These features are most useful when media migration becomes part of a repeatable deployment or maintenance process rather than a one-time task.
A Practical Migration Workflow for Agencies
Agencies often migrate more than one site and need a process that another team member can understand and repeat.
A practical sequence is:
- Back up source and destination.
- Export the source Media Library to CSV.
- Store the CSV with the project migration files.
- Review the source URLs, relative paths, and metadata columns.
- Move files separately when Local Import Mode is more efficient.
- Validate and preview the CSV on the destination site.
- Run a small test batch first.
- Process the remaining library.
- Review the log and skipped duplicates.
- Check representative pages, products, posts, and media records on the destination.
This creates an audit trail that is much easier to understand than an undocumented manual re-upload process.
A Practical Migration Workflow for Site Owners
If you are moving your own WordPress site, the process can be simpler:
- Create a full backup.
- Export your Media Library to CSV.
- Install Export/Import Media on the new site.
- Validate and preview the CSV.
- Import the files in batches.
- Check several images and documents manually.
- Confirm that alt text, titles, captions, and descriptions were preserved.
- Open important pages and posts and verify that their media loads correctly.
If the library is very large, test the migration on staging before running it on production.
Common WordPress Media Migration Mistakes
Copying Only the Uploads Folder
Moving the physical files alone does not automatically recreate all WordPress attachment records and editorial metadata. If files are copied directly to the server, use a workflow that also registers them correctly in the Media Library.
Ignoring Relative Paths
Flattening a long-established year/month structure can create unnecessary differences between the original and destination libraries. Preserve relative paths when they matter to the migration.
Importing Without a Preview
A malformed CSV or incorrect URL pattern can affect hundreds of rows. Validate and preview before processing a production library.
Assuming Every Duplicate Should Be Replaced
During a migration, skipping an existing attachment is often safer than overwriting it automatically. Updating or replacing existing media should be an explicit decision.
Migrating Without Checking the Front End
The Media Library can look correct while a page still contains an old URL, a missing image size, or a relationship that was not recreated. Always verify representative front-end content.
Running a Huge Import as One Uncontrolled Operation
Large media libraries can hit hosting limits. Use controlled batches, monitor the results, and use background processing when the size of the migration requires it.
Frequently Asked Questions
Can I Migrate a WordPress Media Library Without Losing Alt Text?
Yes. A structured media migration can preserve alt text along with other attachment fields. Export/Import Media supports title, alt text, caption, and description columns for standard CSV media workflows.
Can I Export the WordPress Media Library to CSV?
Yes. Export/Import Media can export Media Library data to CSV and filter exports by criteria such as date range, media type, and attachment context.
Does a CSV Contain the Actual Image Files?
No. The CSV acts as structured migration data. The actual media files still need to be available remotely or already present on the destination server for Local Import Mode.
Can I Move Files to the Server First and Register Them Later?
Yes. Local Import Mode is designed for files that already exist inside the WordPress uploads directory and need to be registered in the Media Library without downloading them again.
Will the Plugin Create Duplicate Media?
The standard free import workflow includes duplicate detection and skips detected existing matches instead of intentionally creating another attachment for the same media.
Can I Preserve WordPress Year and Month Upload Folders?
Yes. Relative-path support can preserve or reuse year/month upload structures when the CSV and migration workflow provide the required path information.
Can I Update Existing Media Metadata After a Migration?
Yes, with Export/Import Media Pro. The free workflow imports new media and skips detected duplicates, while Pro includes workflows for updating existing attachments and selecting which metadata fields should be changed.
Can I Roll Back a Media Import?
The free plugin includes preview and downloadable import logs but does not provide rollback. Pro adds restore points and rollback for supported import operations when the required restore data is available.
What Is the Best Way to Migrate a Large WordPress Media Library?
Use a staged process: back up the sites, export and review the CSV, decide whether remote or local import is more efficient, test a small batch, and verify the result before processing the entire library. For larger jobs, background queue processing can reduce dependence on an open browser session.
Migrate WordPress Media Without Rebuilding the Library by Hand
A WordPress Media Library migration should preserve the structure and editorial work that already exists around your files—not force you to upload every image again and rebuild metadata manually.
By exporting the library to CSV, reviewing the data before import, preserving relative paths, detecting duplicates, and validating the destination after migration, you can make the process safer and much easier to repeat.
For a one-time migration, the free Export/Import Media plugin on WordPress.org provides the core CSV workflow. For agencies and developers handling larger or recurring media operations, Export/Import Media Pro adds existing-media updates, background processing, restore points, saved workflows, and other advanced controls.
The important part is not simply moving files. It is making sure the destination WordPress site receives a Media Library that is organized, usable, and ready to continue working after the migration.